In this example we'll show you how to create a workflow for managing an email campaign, however the principle can be applied to any set of apps. We've chosen a few of our favorites to use in this example:
- BeePro for creating the email
- Grammarly for copywriting and spellcheck
- Sendy for list management and distribution
- PostHog for analytics.
In addition to these tools, there are always other apps you'll need to deliver a successful campaign, such as:
- Google Workspaces for sharing documents and content
- Trello and Slack for project collaboration
- Gmail, Hotmail, Outlook, iCloud & other webmail accounts for testing your email.
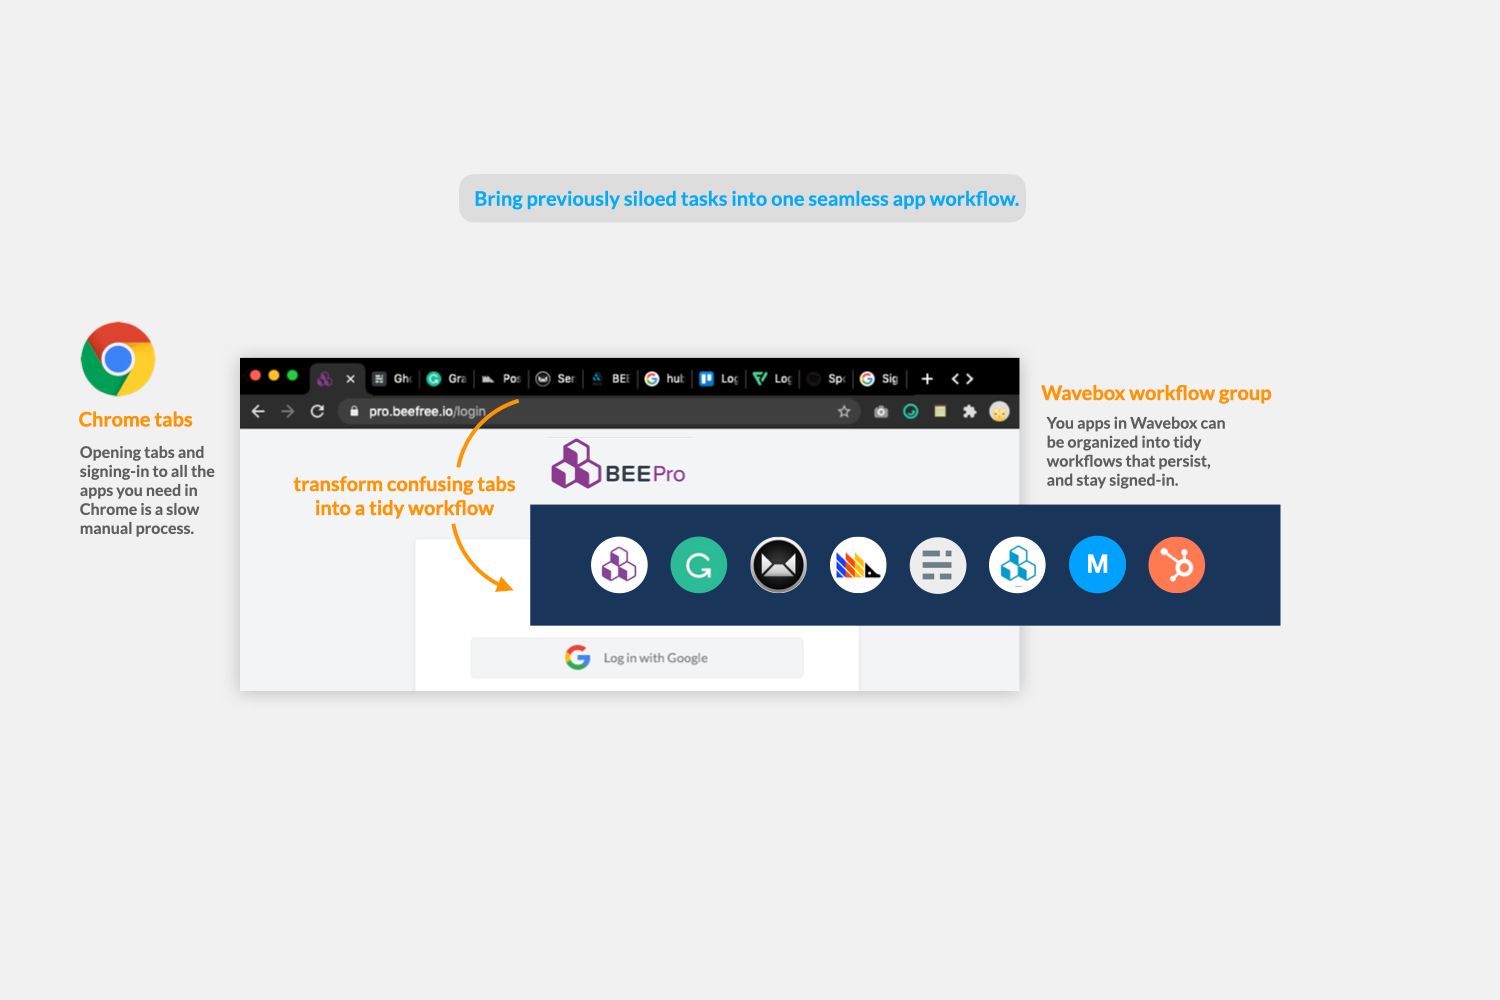
So altogether, that's at least ten apps you need to get the job done, which is too many tabs to manage productively in Chrome. So that's why we need Wavebox to bring them altogether into one seamless workflow.
Quick note before we start - when reading this guide, think about what other apps you and your team can bring together in a Wavebox workflow to improve productivity and save valuable time e.g. finance, projects, design, development etc.
1) Start your workflow by adding your first apps.
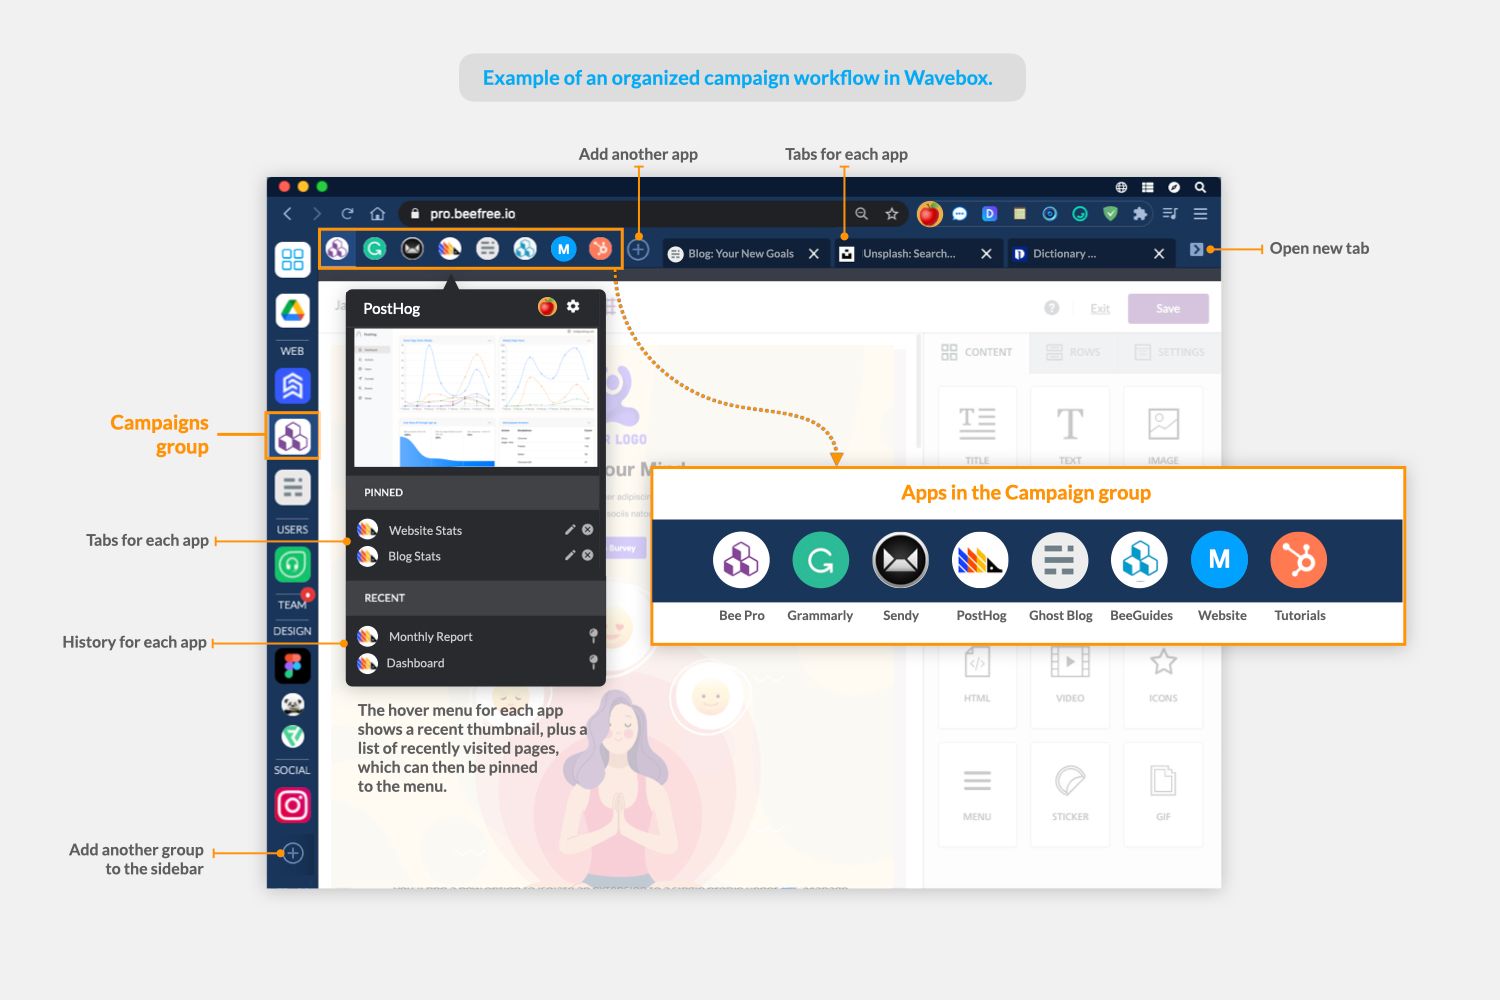
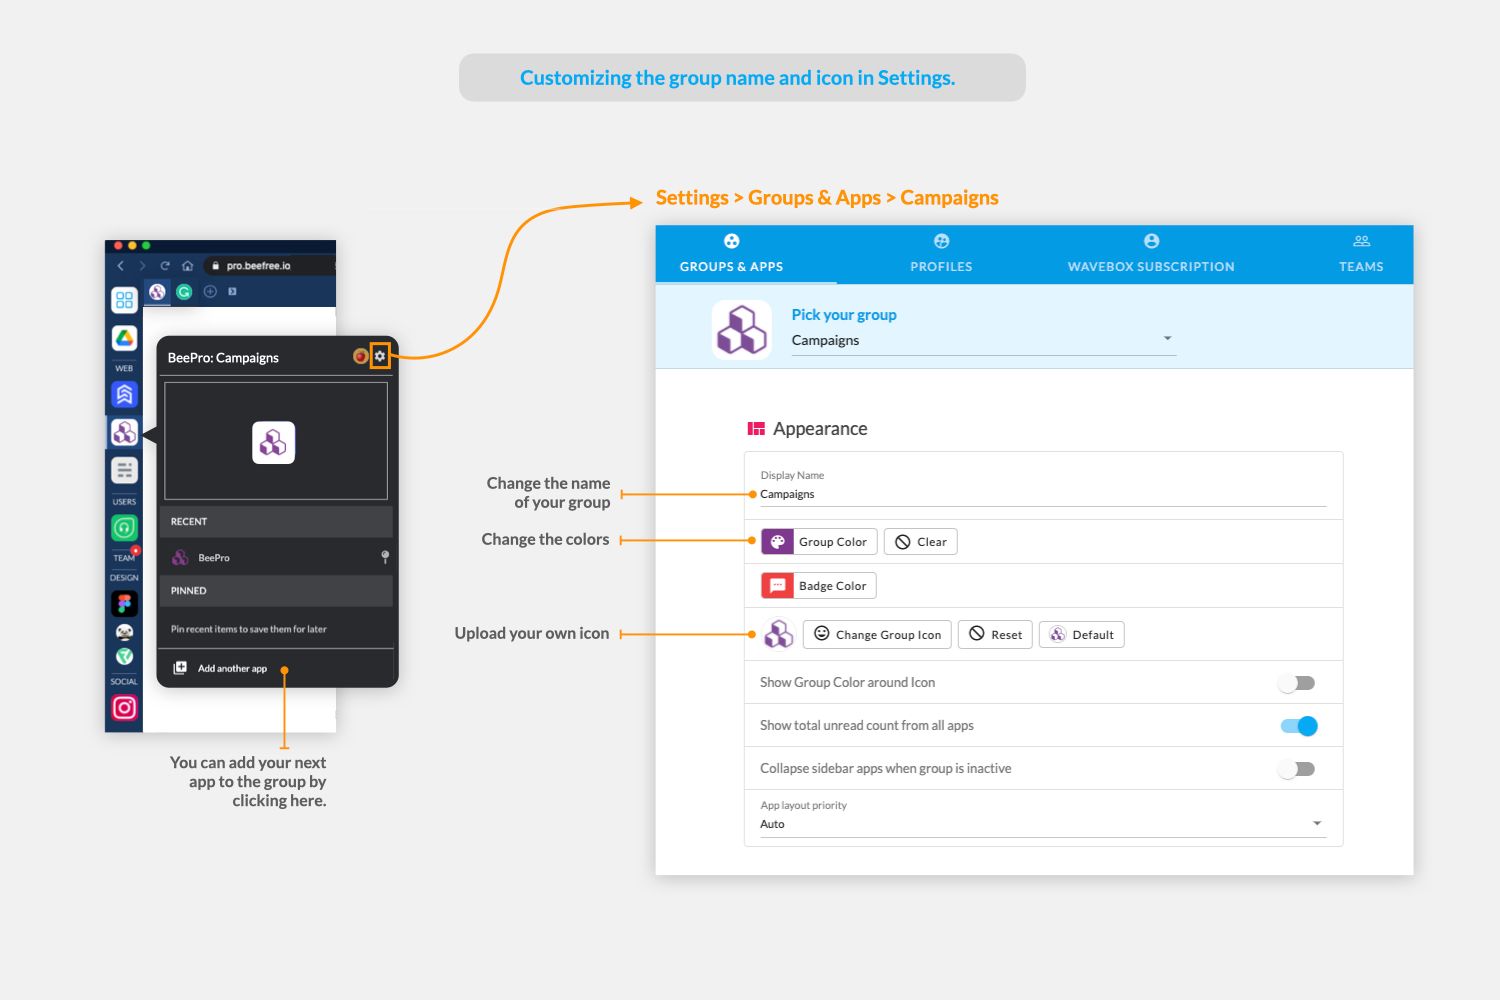
The screenshot shows what your workflow will look like at the end. First create a group in the sidebar (labeled 'Campaigns group' in the screenshot) - you'll click on this to see all the other apps in that group in the top toolbar (labeled 'Apps in the campaign group'). You can choose any app to start with, it doesn't matter. I normally start with the most frequently used app in the workflow, which is BeePro in this case. Note that you can change the order of your apps at any time by dragging the icons around.
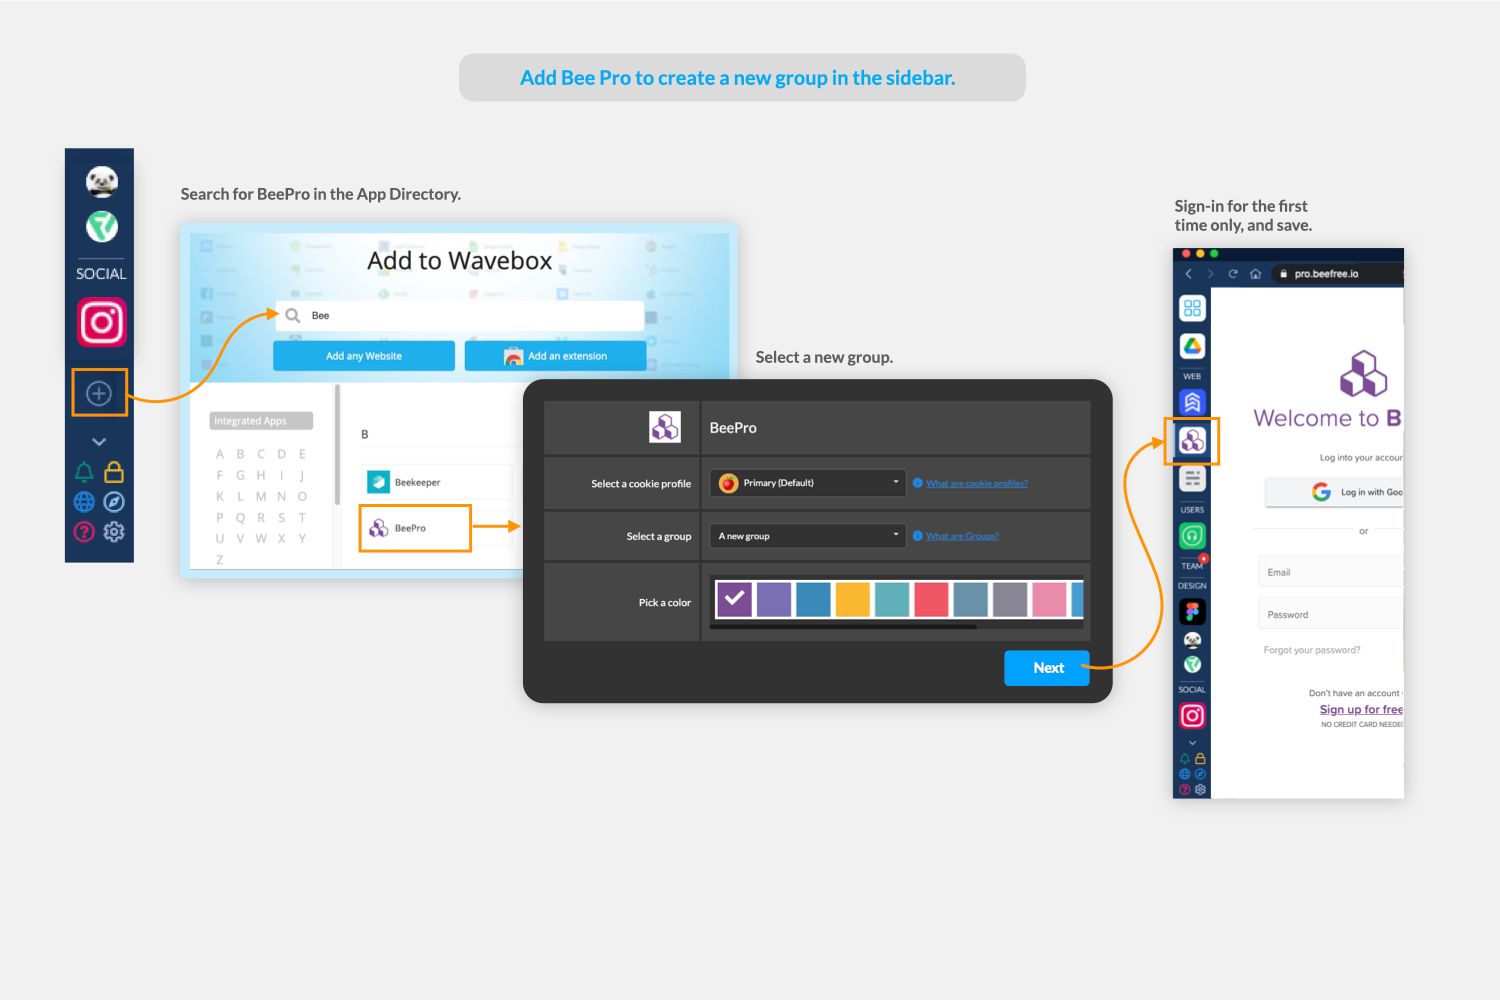
Click on the + icon at the bottom of the sidebar to bring up the App Directory. You can add anything with a URL to Wavebox, just like any other browser, but most users find it easier to start with the Directory. Type 'BeePro' into the search box to bring up the listing. From the group settings window, keep the default cookie container selected for the app (more on cookie containers at the end of this section), select a group (we're creating a new one), and choose a colour for the group border. The icon will then appear in the sidebar, and you'll need to sign-in for the first time - these details will be saved in Wavebox (like in Chrome) so you don't need to sign-in again.
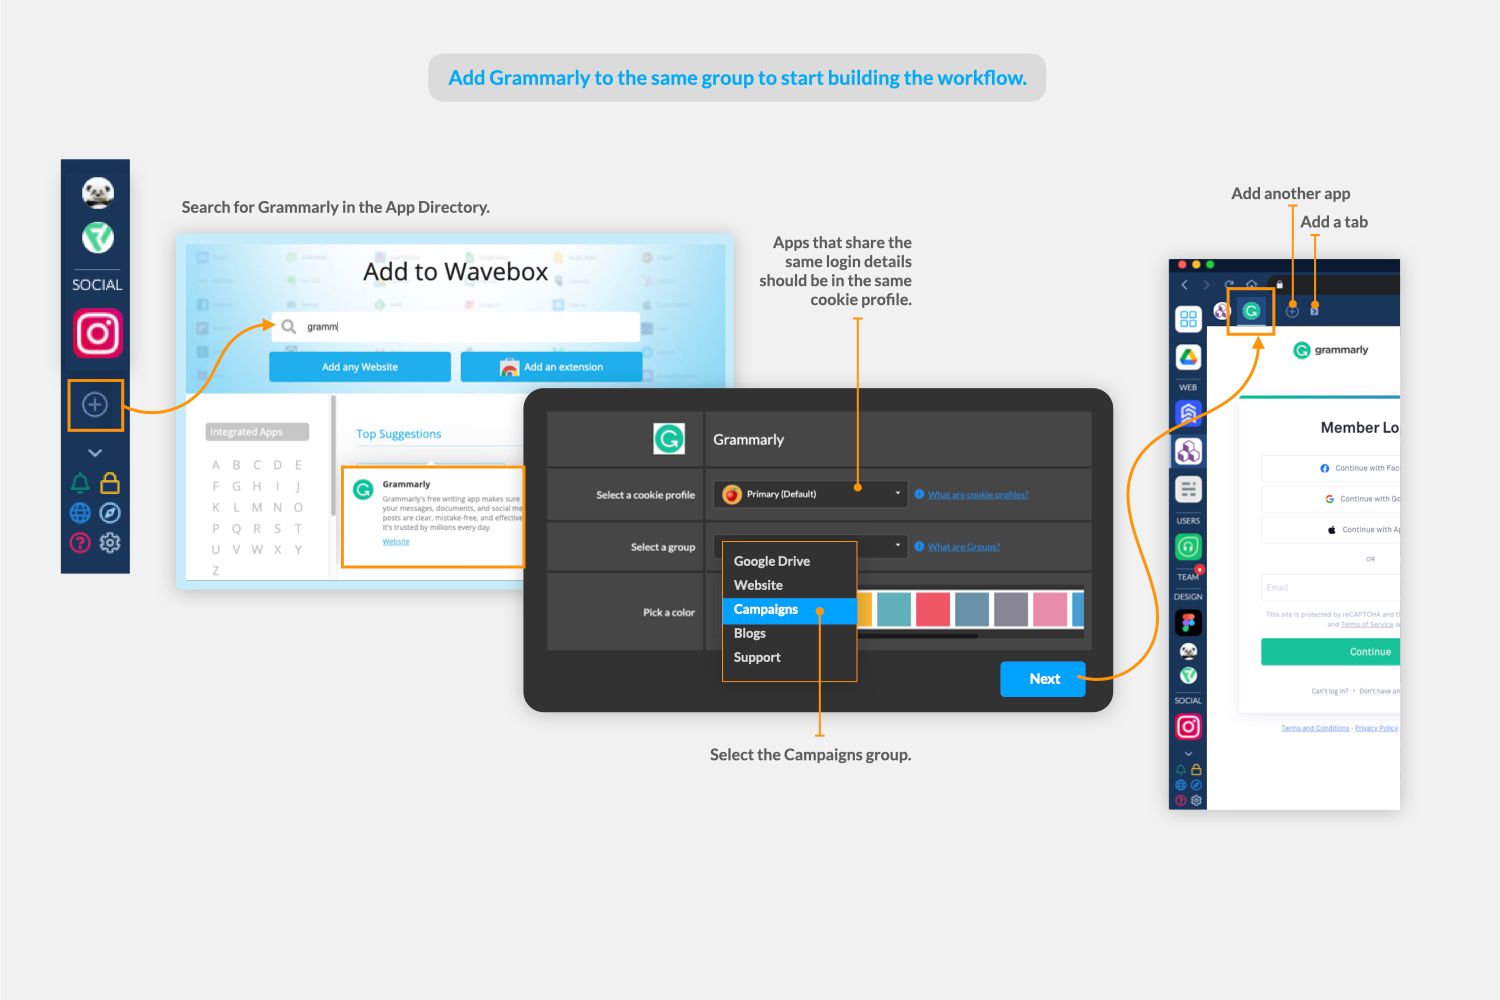
Next, we'll add another app to the workflow. This time we're going to add Grammarly. So, click on the + icon in the sidebar as before, and find Grammarly in the App Directory. As this is the second app in the group, the icon appears as a smaller circle in the top toolbar. These are the icons you'll use to switch between apps in the workflow.
Now we're going to add the email campaign tool Sendy, and an excellent analytics tool called PostHog. This time, you can click on the + icon in the top toolbar to add them to the workflow. Continue this process until all the apps you need are in the group. Note: If you can't find an app in the Directory, click on the 'Add any Weblink' button and paste in the URL instead.
Any other apps you need to complete your email campaign can be added to Wavebox, if they aren't already. These don't necessarily need to be in the campaign group. For example, Gmail will probably be in your sidebar as a group, with all the Google Workspaces icons in the top toolbar. Outlook maybe in the sidebar too, with Trello and Slack in a 'Teams' group together - it's totally up to you how you organize your apps in Wavebox.
Note on cookie containers: You'll probably use the default cookie container for all your apps in Wavebox, unless you add multiple accounts of the same type e.g. Gmail, Slack etc, when you need to choose a different cookie container for each. Apps in a group can have different cookie containers, but if you want to be able to link from one to the other, and not have to sign-in-and-out during your workflow, then use the same cookie container for all apps in the group. More on cookie containers.
2) Create content, test and send.
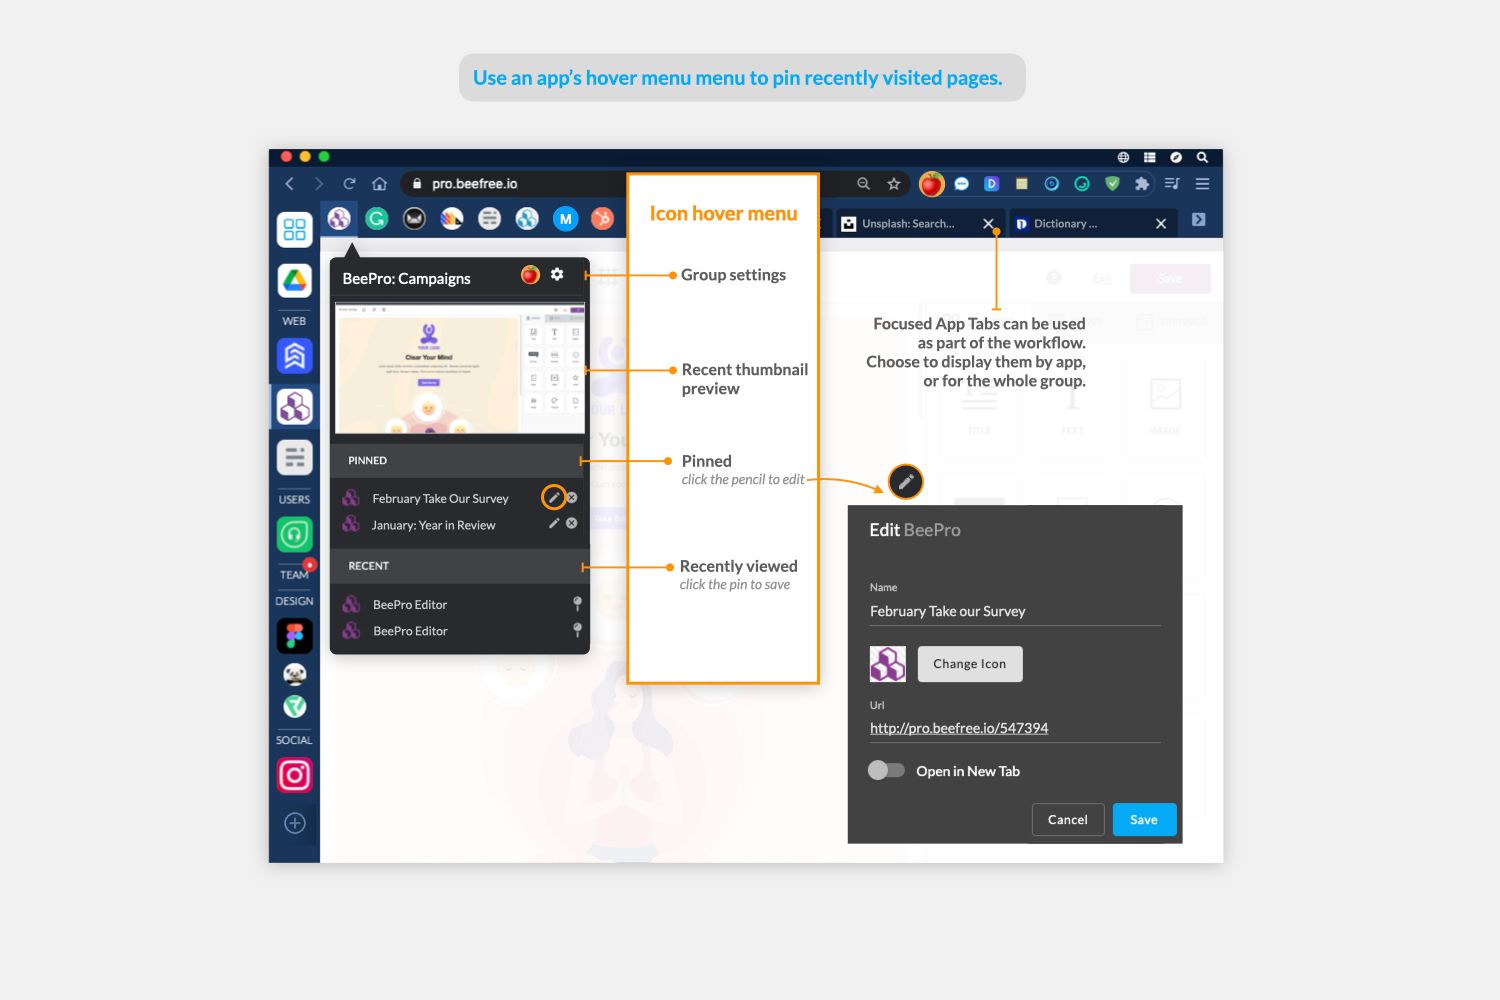
By switching between the apps in the top toolbar, you can quickly create your campaign. Start with a new email project in BeePro, making sure that you 'pin' it to the app's hover menu (shown above), so that you can find it quickly next time. Then copy your text from Grammarly and paste it into your BeePro template. You can navigate quickly between these apps, without worrying about losing your place or accidentally closing a tab. Everything in Wavebox - groups, apps, tabs, windows - will persists until they're either closed or deleted.
It's worth noting that within each group/app you can use 'focused tabs' to work across different websites (labeled in the screenshot above as Focused App Tabs). For example, maybe you have a blog post you want to refer to, or perhaps you need to quickly search Google for an image to use? Just click on the > icon to open a new tab. App tabs persist until closed, so you have the option to include them in the workflow.
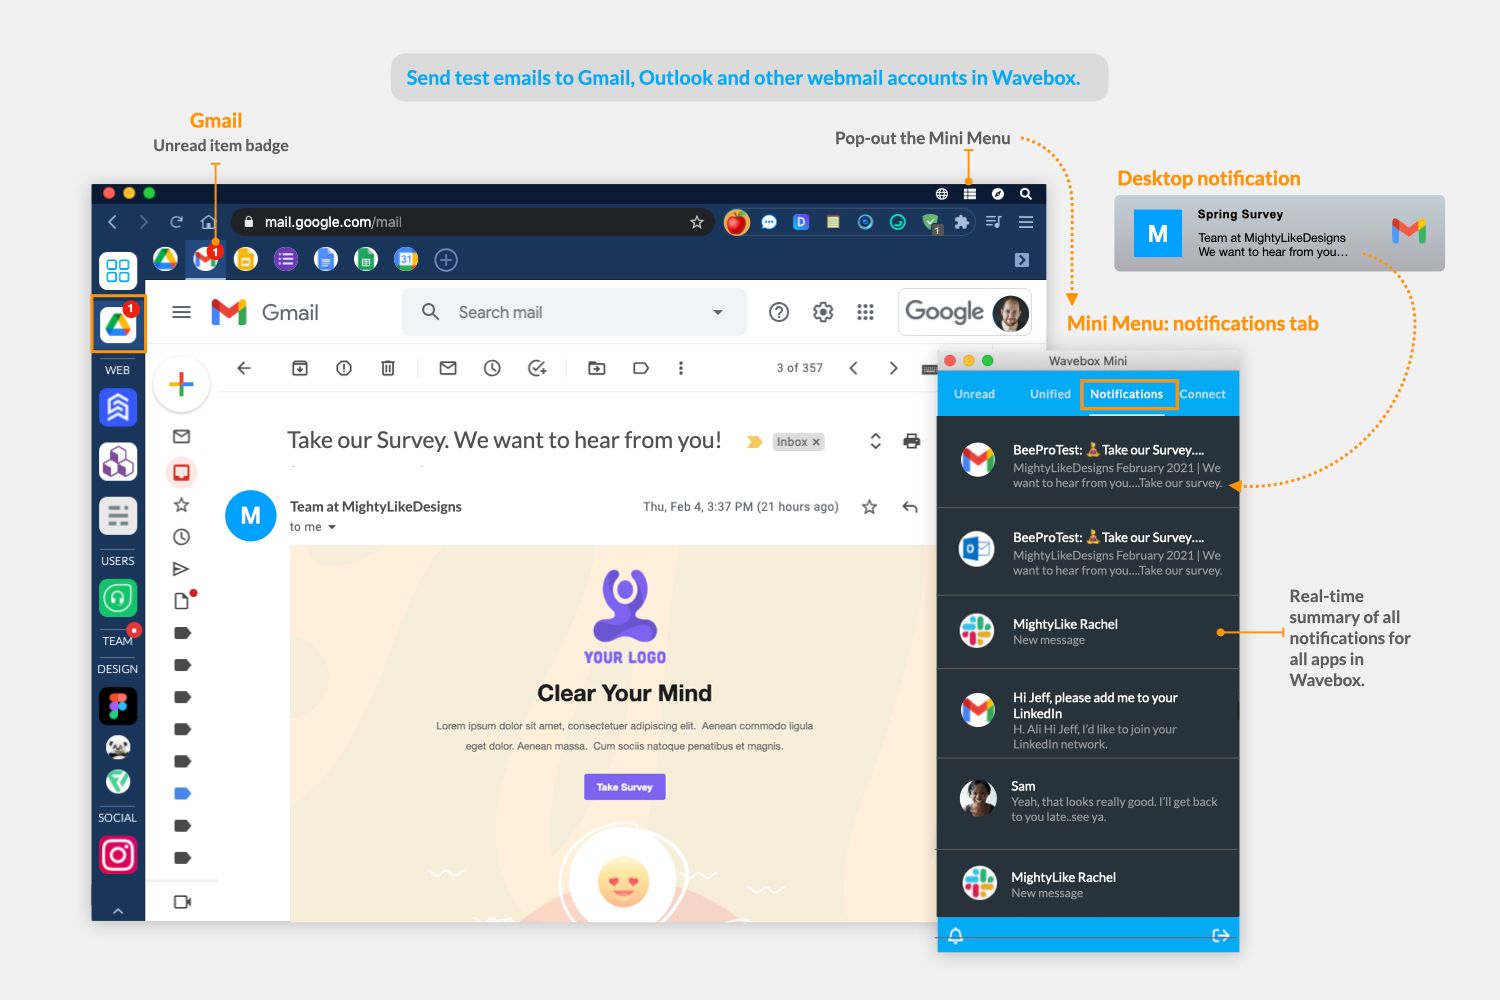
Once you're done, you can send some test emails from BeePro. If your webmail accounts are in Wavebox e.g. Gmail, then you'll see your tests arrive as desktop notifications, which will also show in the Mini Menu (a unified list of everything new in Wavebox shown in the above screenshot) in case you missed it, and you can click on the notification to go directly to that email. You'll also note a red 'unread badge' on the Gmail app icon, which indicates that there's something new to see. Finally, when your email is ready, you can export the HTML from BeePro and transfer to Sendy, before sending it to your mailing list. Job done, cocktails all around! 🙌🍸🍹
Having all these apps organized into a tidy workflow, will not only save you valuable time but also make a stressful process seem much more enjoyable.
But our workflow story doesn't end there....
3) Check reports and manage subscribers.
Once your email has bee sent, it's probably time to move on to your next piece of work. However, your new Campaign workflow will stay in the sidebar, ready for you to access at any time - whether it's to quickly check some stats, manage subscribers, or start drafting your next campaign. And any new notifications for apps in the group will continue to appear on your desktop and in the Mini Menu to keep you up-to-date.
So your Campaign group will stay in the sidebar, but it wont be using up any valuable resources. This is because Wavebox automatically sleeps (hibernate) in active apps to save memory, so you can carry on working in other tools without compromising performance. When you're ready to work in the campaign group again, just click on it, and your apps will wake up. Sleep is a default setting in Wavebox for all apps. However, you can easily change the sleep behavior app-by-app in Settings.
4) Link with other workflows.
Hopefully, your Wavebox will be full of organized workflows like this one e.g. for sales, finance, clients, products, projects - anything! And one of the main benefits of having all your apps together in one place is that links work seamlessly across them.
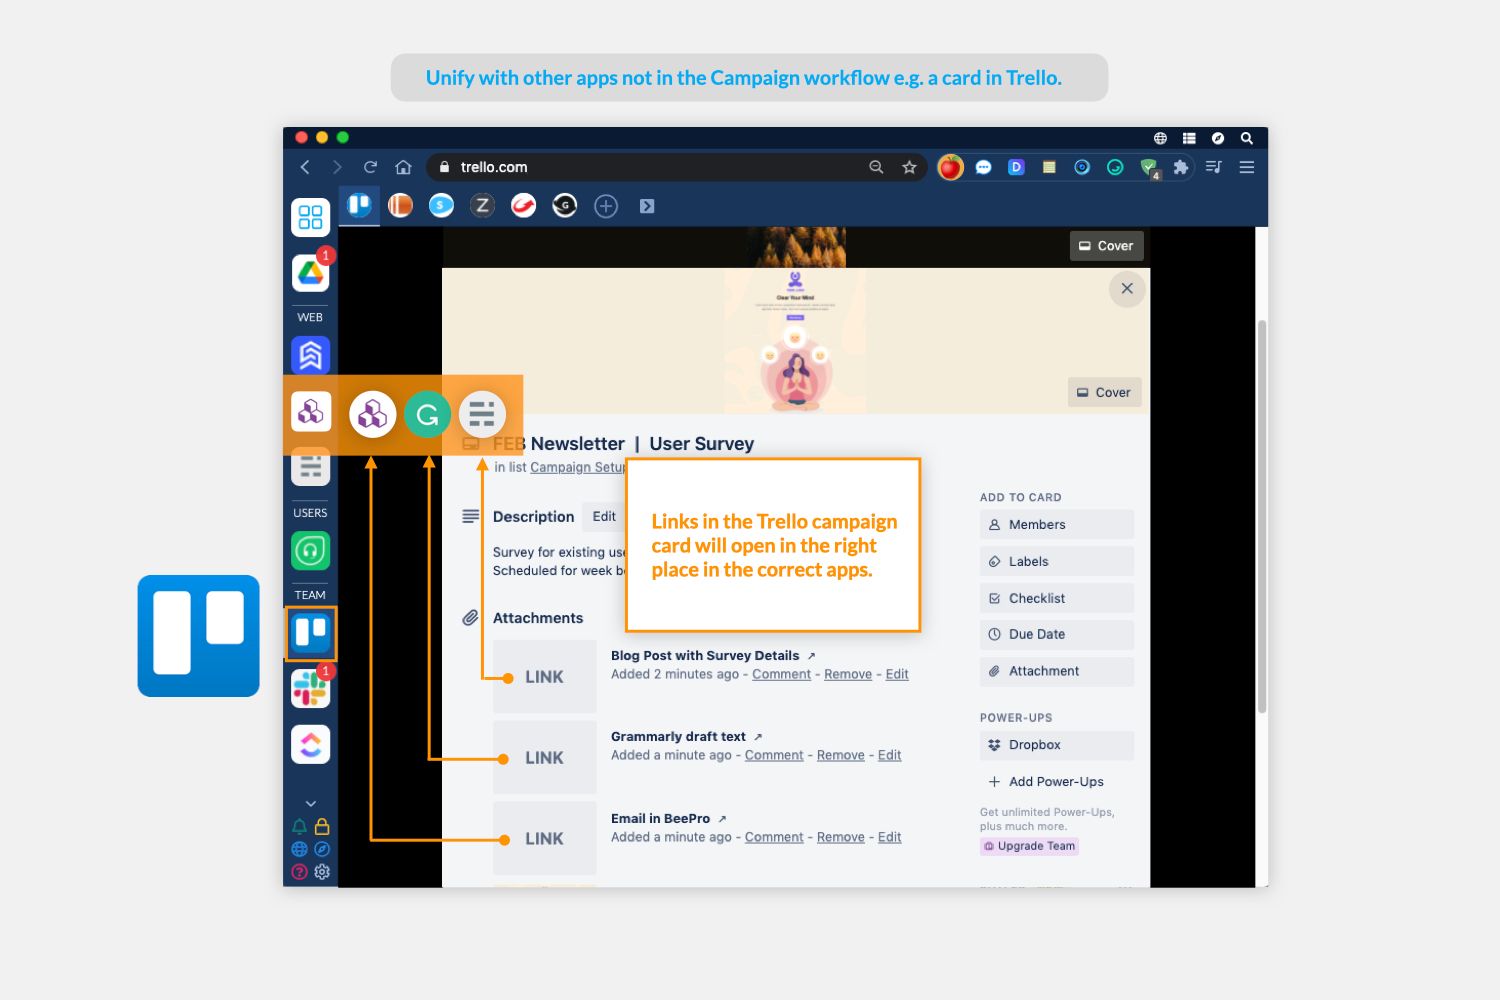
Here's an example - in a Projects sidebar group, you may have a shared Trello board for marketing and email campaigns. If you place links to BeePro, Grammarly, and Sendy links in a Trello card, they will open in the correct apps in the workflow you just created (as shown in the screenshot gif above). Wavebox learns how you want your links to open as you work, but you can also create your own link opening rules to better suit your workflow. Learn more about Wavebox's unique Link Engine in this blog post.
4) Share your new workflow with teammates using Workspaces.
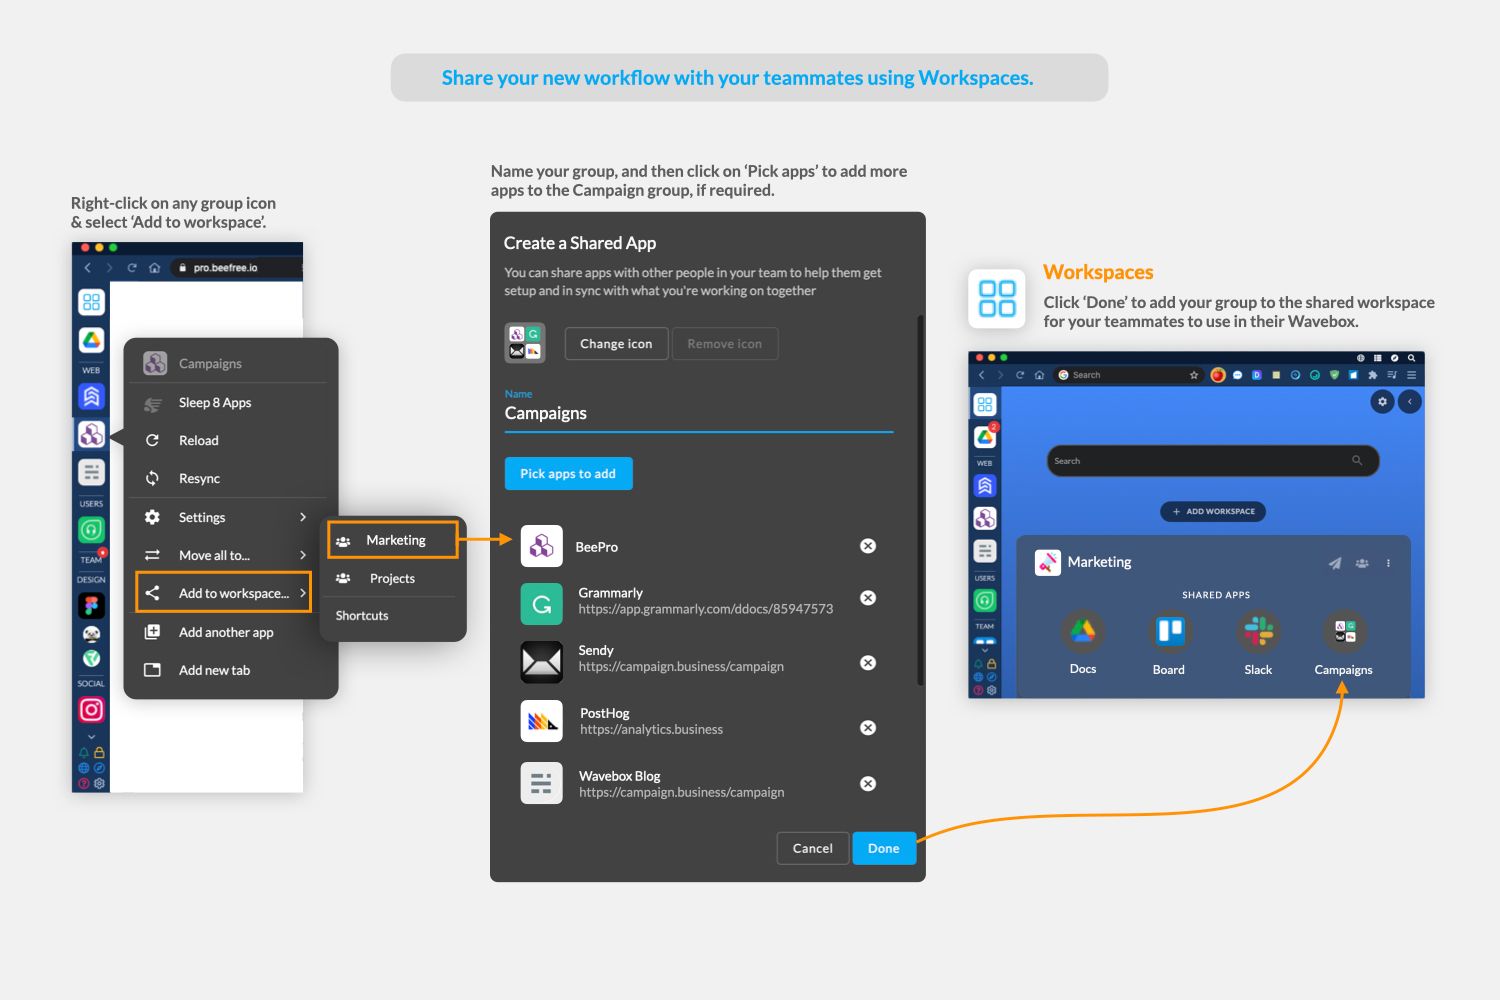
Now that you have a shiny new campaign workflow, you may want to share it with others in your team, and Wavebox allows you to do this using Workspaces. First, create a Wavebox Connect team by clicking on the blue speech bubble in the top toolbar and inviting your teammates. Once they've installed Wavebox, they're all set to share your workflow. Learn more about Connect in this blog post.
Next, right-click on the campaign group icon in the sidebar and select 'Add to Workspace,' then choose the shared workspace for the team you just created, e.g. Marketing. This workspace will be visible to all team members and is invaluable for sharing apps, links, and onboarding. All your teammates need to do is right-click on the Campaign group icon and select 'Add Apps', and the group will magically appear in their Wavebox sidebar. Voila!
And that's all there is to it. After creating one workflow, you'll find it super-easy to build more, so you can work faster and reclaim so much wasted time! Enjoy!